How to Setup Ubuntu 26.04 with Btrfs
Ubuntu 26.04 LTS was released a month ago and it comes with Linux kernel version 7.0 which was also release a month ago. https://en.wikipedia.org/wiki/Linux_kernel_version_history
Let's evaluate if Ubuntu is a good recommendation for someone looking for an alternative to Windows.
On paper it is a great recommendation:
- Data corruption repair (Btrfs/ZFS)
- Immune to Windows malware
- Immune to phone scams
- Can't install three different antiviruses at the same time and make the computer slow
- No forced disruptive updates (ex. Copilot all the things)
- No long waits for Windows to update
I'm using a Dell Latitude 5520 laptop from 2021, so there shouldn't be any drivers missing or any issues for 5 year old hardware.
My goal is simple, install Ubuntu 26.04 and use Btrfs with local snapshots as backups on a 5 year old laptop.
Since you can't create Btrfs subvolumes in the Installer this is a guide to create Btrfs subvolumes, configure hibernate to work with them and improve the suspend battery usage.
Installation Wizard
The installation wizard doesn't have an option for Btrfs but it does have an option for ZFS. Btrfs has been around for several years, it should be an options like ZFS.
That's okay I'll just manually create a partition with a Btrfs filesystem and some Btrfs subvolumes.
The partition manager in the wizard is clunky. First I tried to create a FAT32 boot partition but there is no FAT32 filesystem option.
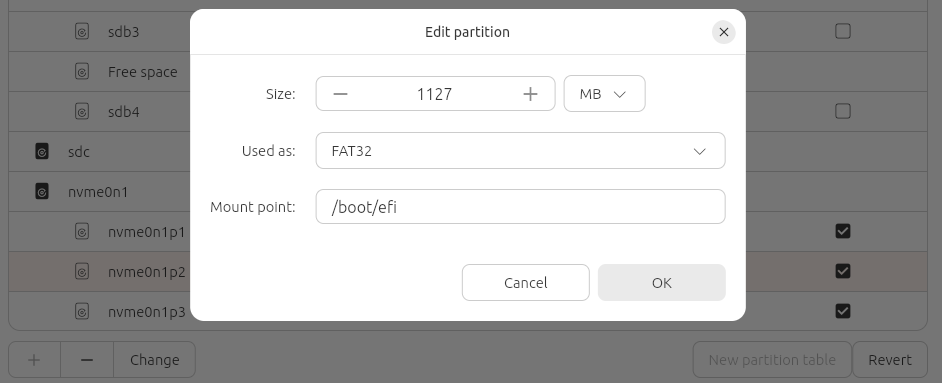
Curiously ZFS is not an option even though it was one of the filesystems you could pick if you didn't select manual partitions.
I selected VFAT and /boot mount point.
But it didn't like that:
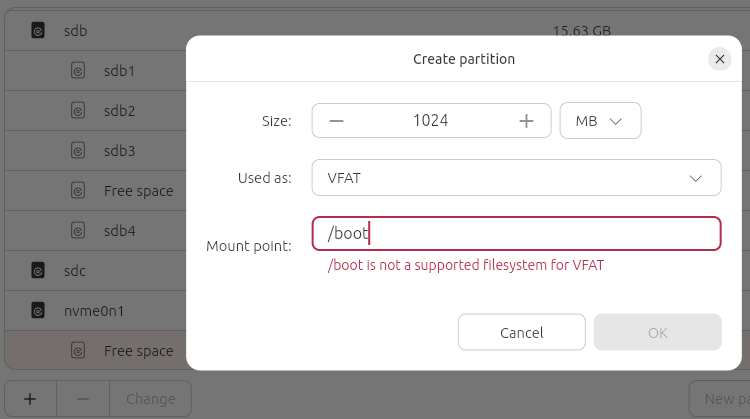
/boot is not a supported filesystem for VFAT.
The partition step in the installation wizard will let you create a Btrfs partition but it won't let you create a subvolume. That's not ideal since you won't be able to use Timeshift which will automatically create snapshots (backups) that you can use to restore your filesystem. Timeshift takes snapshots of a subvolume and stores them in a subvolume.
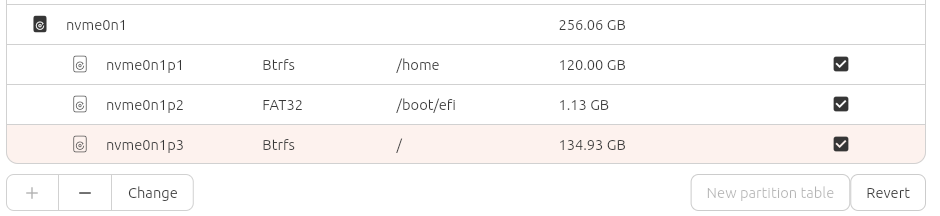
Alright I'll create two Btrfs partitions for now and I'll move the files into subvolumes later. I created a Btrfs partition for /home which is nvme0n1p1 and it automatically creates a boot partition labeled nvme0n1p2. I would like the boot partition to be the first partition but since you can't create a FAT32 partition and you can't change the partition name of the boot partition it automatically created, the first partition can't be the first partition. I'm not a perfectionist so this isn't a big deal.
I created another Btrfs partition for / which is nvme0n1p3.
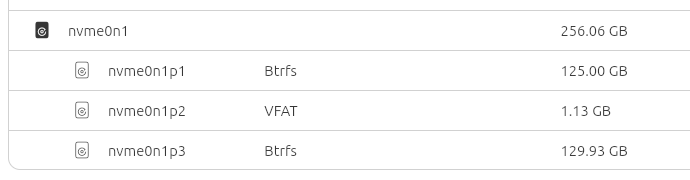
Curiously when I ran the installer again it to get the steps down it showed the boot partition which was previously FAT32 as VFAT, which is confusing.
Creating Btrfs Subvolumes
This is how I moved the files in the partition into a new Btrfs subvolume in the partition so I could use Timeshift. I also enabled zstd compression while I was at it.
I booted back into the live environment of the installation media and ran the following commands.
I opened a terminal with ctrl+alt+t and ran:
sudo mkdir -p /mnt/home
sudo mount /dev/nvme0n1p1 /mnt/home
sudo btrfs subvolume create /mnt/home/@home
sudo mv /mnt/home/* /mnt/home/@home/
Ignore this error.
mv: cannot move '/mnt/home/@home' to a subdirectory of itself, '/mnt/home/@home/@home'
There is definitely a better command but that works.
While the subvolume is mounted we can compress the files.
sudo btrfs filesystem defragment -r -v -czstd /mnt/home/@home
Unmount /home partition
sudo umount /mnt/home
sudo rmdir /mnt/home
Move files in / partition to new @ Btrfs subvolume
sudo mount /dev/nvme0n1p3 /mnt
sudo btrfs subvolume create /mnt/@
cd /mnt/
sudo mv boot dev lib64 proc run snap sys usr bin cdrom etc lib media opt root sbin srv tmp var -t @
sudo rmdir home mnt
cd
sudo vi /mnt/@/etc/fstab
Find defaults for both of the Btrfs partitions and add the subvol and compress so future files will be compressed.
defaults,subvol=@,compress=zstd:3
defaults,subvol=@home,compress=zstd:3
Curiously the pass value which is the last value on the line is 1 when it should be 0 for Btrfs.
Why wasn't it set when the filesystem was set to Btrfs?
Here is what my /etc/fstab contains
# / was on /dev/nvme0n1p3 during curtin installation
/dev/disk/by-uuid/8026ffff-0d1a-4f2c-9afa-901d6d34763a / btrfs defaults,subvol=@,compress=zstd:3 0 0
# /home was on /dev/nvme0n1p1 during curtin installation
/dev/disk/by-uuid/b6a801ac-fbe1-437c-bd76-107333946ef2 /home btrfs defaults,subvol=@home,compress=zstd:3 0 0
# /boot/efi was on /dev/nvme0n1p2 during curtin installation
/dev/disk/by-uuid/E019-C652 /boot/efi vfat defaults 0 1
Now that we modified /etc/fstab we an compress all of the files.
sudo btrfs filesystem defragment -r -v -czstd /mnt/@
Unmount
sudo umount /mnt
Now there are two options to fix booting into Ubuntu.
Fix boot via GRUB menu
I shutdown and removed the installation media and booted, but unfortunately it didn't boot into Ubuntu, instead I ended up in the GRUB console.
Since there is one drive and the / partition is the third partition (nvme0n1p3) I ran:
set root=(hd0,gpt3)
linux /@/boot/vmlinuz root=/dev/nvme0n1p3 rootflags=subvol=@ ro
initrd /@/boot/initrd.img
boot
After logging into Ubuntu I opened a terminal and ran:
# Update boot partition grub.cfg
sudo grub-install /dev/nvme0n1
# Update Btrfs (/) partition grub.cfg
sudo update-grub
Then I rebooted and verified it boot into Ubuntu.
sudo reboot
Fix boot by modifying partitions
If you are already able to boot into Ubuntu after moving the files into subvolumes then you don't need to do this. Do this instead of the commands in the GRUB console.
In the live installer environment mount the boot partition.
sudo mkdir -p /mnt/boot
sudo mount /dev/nvme0n1p2 /mnt/boot
I thought I would modify the switch_root command in /init, but I didn't see an /init or initramfs or initrd.
.
└── EFI
    ├── BOOT
    │   ├── BOOTX64.EFI
    │   ├── fbx64.efi
    │   └── mmx64.efi
    └── ubuntu
        ├── BOOTX64.CSV
        ├── grub.cfg
        ├── grubx64.efi
        ├── mmx64.efi
        └── shimx64.efi

4 directories, 8 files
du -sh /mnt/boot
6.4M /mnt/boot
If the boot partition is so small why did Ubuntu create it with 1GB of space? I know if I install other OSes they will also add files to this partition for example in addition to /EFI/ubuntu/ there could be /EFI/windows. I wonder how big the windows folder would be?
Also motherboard firmware updates are copied to the boot partition so the motherboard can use them to update
1GB seems very large I guess most people don't miss 1GB.
I did see a grub.cfg and I fixed the path in it.
sudo vi /mnt/boot/EFI/ubuntu/grub.cfg
Before
search.fs_uuid 8026ffff-0d1a-4f2c-9afa-901d6d34763a root
set prefix=($root)'/boot/grub'
configfile $prefix/grub.cfg
After
search.fs_uuid 8026ffff-0d1a-4f2c-9afa-901d6d34763a root
set prefix=($root)'/@/boot/grub'
configfile $prefix/grub.cfg
Since it references grub.cfg on the / partition we need to fix that.
Umount boot partition
sudo umount /mnt/boot
sudo rmdir /mnt/boot
Remount the / partition.
sudo mount /dev/nvme0n1p3 /mnt
sudo vi /mnt/@/boot/grub/grub.cfg
Hmm it says not to edit this file directly.
# DO NOT EDIT THIS FILE
#
# It is automatically generated by grub-mkconfig using templates
# from /etc/grub.d and settings from /etc/default/grub
#
Well I need to change each path to start with /@ for example font="/usr/share/grub/unicode.pf2" should be font="/@/usr/share/grub/unicode.pf2"
But I won't edit the file because I don't know if the changes will persist or if they do, they won't persist for long.
sudo umount /mnt
# Mount your new root subvolume (@)
sudo mount -o subvol=@ /dev/nvme0n1p3 /mnt

# Mount your EFI partition into the right spot inside it
sudo mount /dev/nvme0n1p2 /mnt/boot/efi

# Bind the system hardware directories so the chroot environment can see your drive
for i in /dev /dev/pts /proc /sys /run; do sudo mount --bind $i /mnt$i; done

# Jump inside your subvolume as "root"
sudo chroot /mnt

# NOW you can run the fix commands cleanly!
grub-install /dev/nvme0n1
update-grub

# Exit the chroot
exit
Shutdown remove the installation media and boot and verify it boots into Ubuntu.
Don't show GRUB menu
After verifying it is working I prevented the GRUB menu from being shown on boot by
sudo vi /etc/default/grub
GRUB_TIMEOUT_STYLE=countdown
GRUB_TIMEOUT=0
GRUB_RECORDFAIL_TIMEOUT=0
GRUB_DISABLE_OS_PROBER=true
sudo update-grub
After reboot I verified that the GRUB menu is not shown and it boots into Ubuntu.
sudo reboot
Install Timeshift (Btrfs Backups)
Now that we have Btrfs subvolumes and we can use Timeshift!
sudo apt install timeshift
Now open Timeshift by pressing super and then type Timeshift or run timeshift-gtk in the terminal.
Select btrfs and set the number of snapshots you would like to keep.

Battery drain when idle
Out of the box the battery was being drained while suspended. I had 80% battery and after 4 hours the battery was at 50%. So what's going on?
I set the laptop to suspend when closed by
sudo vi /etc/systemd/logind.conf.d/99-laptop-lid.conf
[Login]
HandleLidSwitch=suspend
HandleLidSwitchExternalPower=suspend
sudo systemctl restart systemd-logind
This laptop has an Intel 11th Gen Core processor (Tiger Lake) so we can only use s2idle.
cat /sys/power/mem_sleep
[s2idle]
If there is a deep option without square brackets, which means not selected. Then you can add this to /etc/default/grub
GRUB_CMDLINE_LINUX_DEFAULT="quiet splash mem_sleep_default=deep"
sudo update-grub
To know if the computer is not entering a low power suspend you can suspend it and then wait a couple minutes and then check if the amount of time it spent in the different suspend states increased.
systemctl suspend
after waiting a couple minutes, wake it up by moving the mouse or pressing a key on the keyboard
sudo cat /sys/kernel/debug/pmc_core/substate_residencies
pmc0   Substate       Residency
         S0i2.0               0
         S0i3.0               0
If the values are 0 then it is not entering lower power states.
To check why run
sudo cat /sys/kernel/debug/pmc_core/ltr_show
This is what I did to get it to actually enter low power states.
sudo apt install tlp tlp-rdw
sudo tlp start
cat /etc/udev/rules.d/99-fingerprint-autosuspend.rules
ACTION=="add", SUBSYSTEM=="usb", ATTR{idVendor}=="0a5c", ATTR{idProduct}=="5842", ATTR{power/control}="auto"
cat /etc/udev/rules.d/99-pci-pm.rules
ACTION=="add", SUBSYSTEM=="pci", ATTR{vendor}=="0x8086", ATTR{device}=="0xa0f0", ATTR{power/control}="auto"
cat /etc/systemd/system/disable-usb-wakeup.service
[Unit]
Description=Disable USB XHCI wakeup triggers

[Service]
Type=oneshot
ExecStart=/bin/sh -c "echo XHCI > /proc/acpi/wakeup"
RemainAfterExit=yes

[Install]
WantedBy=multi-user.target
cat /etc/systemd/system/disable-cardreader-wakeup.service
[Unit]
Description=Disable Card Reader ACPI Wakeup to fix S0i3 sleep

[Service]
Type=oneshot
ExecStart=/bin/sh -c "grep -q 'RP07.*enabled' /proc/acpi/wakeup && echo RP07 > /proc/acpi/wakeup || true"
RemainAfterExit=yes

[Install]
WantedBy=multi-user.target
Then I just decided to reboot and enter the UEFI settings and disabled Bluetooth, and Thunderbolt since I don't use them and then suspend actually went into lower power modes.
systemctl suspend
sudo cat /sys/kernel/debug/pmc_core/substate_residencies
pmc0   Substate       Residency
         S0i2.0           23912
         S0i3.0       212881216
After making these changes the battery went from 80% to 73% in 6.5 hours while suspended.
Enable Hibernate
If suspend isn't actually entering low power mode you can hibernate instead.
First we need to create a swap file to store everything that is in RAM when we hibernate.
free -h
               total        used        free      shared  buff/cache   available
Mem:            14Gi       2.6Gi       9.2Gi       736Mi       3.8Gi        12Gi
Swap:             0B          0B          0B
sudo mount /dev/nvme0n1p3 /mnt
sudo btrfs subvolume create /mnt/@swap
Add /swap to /etc/fstab
sudo vi /etc/fstab
# /etc/fstab: static file system information.
#
# Use 'blkid' to print the universally unique identifier for a
# device; this may be used with UUID= as a more robust way to name devices
# that works even if disks are added and removed. See fstab(5).
#
# <file system> <mount point>   <type>  <options>       <dump>  <pass>
# / was on /dev/nvme0n1p3 during curtin installation
/dev/disk/by-uuid/8026ffff-0d1a-4f2c-9afa-901d6d34763a / btrfs defaults,subvol=@,compress=zstd:3 0 0
# /home was on /dev/nvme0n1p1 during curtin installation
/dev/disk/by-uuid/b6a801ac-fbe1-437c-bd76-107333946ef2 /home btrfs defaults,subvol=@home,compress=zstd:3 0 0
# /boot/efi was on /dev/nvme0n1p2 during curtin installation
/dev/disk/by-uuid/E019-C652 /boot/efi vfat defaults 0 1
/dev/disk/by-uuid/8026ffff-0d1a-4f2c-9afa-901d6d34763a /swap btrfs subvol=@swap,nodatacow,noatime 0 0
sudo mount /swap
sudo btrfs filesystem mkswapfile --size 16G /swap/swapfile
sudo swapon /swap/swapfile
free -m
               total        used        free      shared  buff/cache   available
Mem:           15203        2918        8700         798        4139       12285
Swap:          16383           0       16383
cat /etc/fstab
# /etc/fstab: static file system information.
#
# Use 'blkid' to print the universally unique identifier for a
# device; this may be used with UUID= as a more robust way to name devices
# that works even if disks are added and removed. See fstab(5).
#
# <file system> <mount point>   <type>  <options>       <dump>  <pass>
# / was on /dev/nvme0n1p3 during curtin installation
/dev/disk/by-uuid/8026ffff-0d1a-4f2c-9afa-901d6d34763a / btrfs defaults,subvol=@,compress=zstd:3 0 0
# /home was on /dev/nvme0n1p1 during curtin installation
/dev/disk/by-uuid/b6a801ac-fbe1-437c-bd76-107333946ef2 /home btrfs defaults,subvol=@home,compress=zstd:3 0 0
# /boot/efi was on /dev/nvme0n1p2 during curtin installation
/dev/disk/by-uuid/E019-C652 /boot/efi vfat defaults 0 1
/dev/disk/by-uuid/8026ffff-0d1a-4f2c-9afa-901d6d34763a /swap btrfs subvol=@swap,nodatacow,noatime 0 0
We need to grab the offset of the swapfile so it can re-populate the RAM on boot.
sudo btrfs inspect-internal map-swapfile /swap/swapfile
Physical start:  19366150144
Resume offset:       4728064
Add resume and resume_offset to /etc/default/grub and don't forget to sudo update-grub.
sudo vi /etc/default/grub
GRUB_CMDLINE_LINUX_DEFAULT="quiet splash resume=UUID=8026ffff-0d1a-4f2c-9afa-901d6d34763a resume_offset=4728064"
sudo update-grub
sudo vi /etc/initramfs-tools/conf.d/resume
RESUME=UUID=8026ffff-0d1a-4f2c-9afa-901d6d34763a
sudo update-initramfs -u -k all
update-initramfs: Generating /boot/initrd.img-7.0.0-15-generic
sudo systemctl hibernate
Now that hibernate is working we can hibernate when we close the laptop.
sudo vi /etc/systemd/logind.conf.d/99-laptop-lid.conf
[Login]
HandleLidSwitch=hibernate
HandleLidSwitchExternalPower=suspend
gsettings set org.gnome.settings-daemon.plugins.power lid-close-battery-action 'hibernate'
You might also want to use suspend-then-hibernate in /etc/systemd/logind.conf.d/99-laptop-lid.conf
[Login]
HandleLidSwitch=suspend-then-hibernate
HandleLidSwitchExternalPower=suspend
Adding Hibernate to Power Off Options
That should work but you won't see hibernate in the Power Off options in the right hand corner. For it to show up there we need to do the following:
sudo vi /etc/polkit-1/rules.d/10-enable-hibernate.rules
polkit.addRule(function(action, subject) {
   if ((action.id == "org.freedesktop.login1.hibernate" ||
        action.id == "org.freedesktop.login1.hibernate-multiple-sessions" ||
        action.id == "org.freedesktop.upower.hibernate" ||
        action.id == "org.freedesktop.login1.handle-hibernate-key" ||
        action.id == "org.freedesktop.login1.hibernate-ignore-inhibit") &&
        subject.isInGroup("sudo")) {
    return polkit.Result.YES;
  }
});
sudo apt update
sudo apt install gnome-shell-extension-manager
Open Extension Manager click browse tab and search hibernate then install the one by slaclau.
Currently it is not listed as supporting GNOME 50 so I had to run:
gsettings set org.gnome.shell disable-extension-version-validation true
Then ensure the new extension is enabled in Extension Manager.
sudo systemctl restart systemd-logind
Increase size of existing swapfile
To make the swapfile larger, for example if you increase the RAM in your computer.
sudo swapoff -a
sudo rm /swap/swapfile
sudo btrfs filesystem mkswapfile --size 20G /swap/swapfile
create swapfile /swap/swapfile size 20.00GiB (21474836480)
sudo swapon /swap/swapfile
swapon --show
NAME           TYPE SIZE USED PRIO
/swap/swapfile file  20G   0B   -1
sudo btrfs inspect-internal map-swapfile -r /swap/swapfile
9970944
sudo findmnt -no UUID -T /swap/swapfile
8026ffff-0d1a-4f2c-9afa-901d6d34763a
sudo vi /etc/default/grub
GRUB_CMDLINE_LINUX_DEFAULT="quiet splash resume=UUID=8026ffff-0d1a-4f2c-9afa-901d6d34763a resume_offset=9970944"
sudo update-grub
Faster programs
If amd64v3 is available we can install executables that are optimized instead of being compatible for old devices.
/lib64/ld-linux-x86-64.so.2 --help | grep x86-64-v3
echo 'APT::Architecture-Variants "amd64v3";' | sudo tee /etc/apt/apt.conf.d/99enable-amd64v3
sudo apt update
1346 packages can be upgraded. Run 'apt list --upgradable' to see them.
sudo apt upgrade -y
To revert if needed.
sudo rm /etc/apt/apt.conf.d/99enable-amd64v3
sudo apt update --list-cleanup
sudo apt update && sudo apt upgrade -y
Conclusion
It should be much easier to use Btrfs with Timeshift, it would be nice if sleep and hibernate just worked on a 5 year old laptop.
Non technical users are not going to know how to fix these issues.
Ubuntu needs to be better for non technical people to use it.
The installer should be improved to make it easier to use Btrfs with subvolumes.